My Small 8' x 6' Antique Booth From Start to Finish

8:10 AM

These are amazon affiliate links. This means that, at no cost to you, I will earn an affiliate commission 
if you click through the link and finalize a purchase. 

A lot of you have shown an interest in the small booth we featured in last week's video. This was the smallest booth I've ever had and unfortunately, I'm not there any longer. As many of you know, I take care of my aging mother as well as help out with a couple of other older family members, so I don't have a lot of free time. Having a booth is something I have always enjoyed and it's therapeutic for me. I thought by having a smaller space, I wouldn't feel as much pressure to keep it stocked. Anyone that's been in this industry long enough knows having a larger booth is a part-time job. 

I'm doing this blog post on my small booth to encourage some of you that are on the fence about this decision. Start small. Remember you can always ask for a larger booth or scale back down when needed. Talk to the store manager. Discuss your concerns with them so they can help you. 

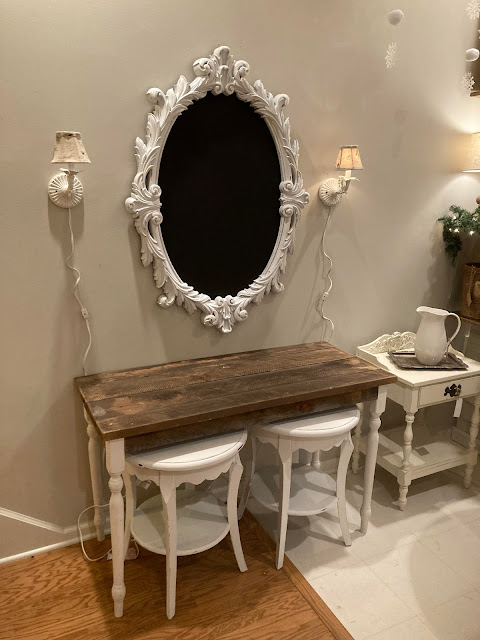
This first photo shows how the booth looked when I went to meet with the owners. I had a vision for the space and I knew I could make it work This was a new shop and they had not opened to the public yet. They allowed each dealer to choose their own paneling. You can see I have an awkward size booth. It's eight feet long by six feet deep. I'm also at the base of a staircase. The upstairs was closed off to the customers but it was storage for the owners so I had to allow enough clearance for them to pass through.  

I painted the wall gray. I was going to put a rug down to camouflage where the tile met the wood, but the transition strip was elevated and I knew it would not allow a rug to lay flush which would have meant a trip hazard.  


This next photo is after the panels were installed. The lighting is off in this photo. The dealer across from me went with shiplap paneling. I'm not getting paid to mention these stores, but you find these panels at Home Depot and Lowes. They measure 8' long x 4' feet wide. They can be installed either vertically or horizontally. There are several patterns to choose from. We had two weeks until opening day, so I was taking my time to make sure everything went right. The half-wall wasn't finished in this photo but I went with picket fence boards. 


Here is a closer look at the faux wood paneling. I believe it was called Weathered Barnwood. It has a lot of gray and blue undertones. I think this paneling looks much better in person. They also make a similar one in all brown. It looks like pallet wood. I show that paneling in the video I did last week. Click here if you want to watch it. 


These panels have increased in price compared to the summer of 2021 when I bought mine. 
I'm sure other lumber yards have something similar. You would just need to call around. 


Here I was trying paint samples. Yes, I tried 6 different paint colors before I decided on one. I also was propping the picket fence boards on the half wall to see how I liked the look. The fence boards are 4 feet tall. As you can see from the photo they were too short because I wanted them to be taller than the existing frame. So I had to add a 5.5" tall baseboard across the bottom. 


Now the half wall is finished. I love how the picket fence boards look. I found these boards at Lowes. From my understanding, this is a seasonal item. They are available spring through late summer. If you can't find them at the big box stores or your local lumberyard, you can find them on Amazon. They are a lot more expensive on Amazon though. 


When I bought mine I only paid $1.25 each. Now, they are $1.58 each. With inflation, I can only imagine the price will increase. These are also fun to use when making signs or other DIY projects and crafts.


This vantage point is from the staircase. I could have used the small shelving on the half wall, but I decided to place an old table there instead. I thought about adding molding to the top of the wall, but I knew I would have merchandise there and it wouldn't be that noticeable. However, I did add a baseboard to the bottom to give it a more finished look. For the pièce de résistance, hung these old couch springs in the ceiling and strung patio lights from them to give the space a bit more lighting. 


This next photo shows my completed booth. I'm starting to bring in merchandise. Since this space was so shallow, I opted to go with shelving on the back wall. I had more smalls than bigger items so I needed the surface space. I went to my local lumberyard for the shelving boards. They are cheaper than Home Depot & Lowes. I asked for 8' boards since this was the length of my back wall. Most stores will cut the lumber for you. 


I stained the boards with General Finishes gel stain in the color Java. I love this stuff. It is not messy like other stains and the smell is a lot more tolerable. You can get this stain in other colors.

I knew I wasn't going to place anything heavy on the shelves so I decided not to use an extra bracket in the center. I already had my brackets from many years ago, but I did find some similar ones on Amazon


This was taken on opening day. I was able to get a good bit of stuff into a booth of this size. 


As you can see from this photo my merchandise is just a hodgepodge of items. This inventory was leftover from previous booths and thrifting hauls. I used to have more free time to go picking. I'm limited in my travels now and it's become a lot harder for me to find those true antique and vintage pieces. 


This little table was the perfect fit behind my half-wall. I bet I could have sold it twenty times. It was my display table and I didn't want to sell it. I kind of went against my own rules here. I always tell dealers to price everything in their booth to sell. 


I went with Sherwin-Williams, Agreeable Gray for my wall color. Looking at this paint chip on my monitor makes it look more brownish. Depending on what device you are viewing from, the monitor colors can vary so it's best to look at a paint chip in person. 


Here is a color chip I went with on my wall. The manager at Sherwin Willams said this is one of their most popular wall colors. 


Just a cute Fall vignette.


I loved decorating the old springs for Christmas. 


These are the patio lights I had in my booth. 

If you lasted this long, thank you. I hope this blog post was helpful. If you have any questions, please reach out to us. We are here to help. 

We also have the post in a Youtube video. Click here to check it out. 

You Might Also Like

0 comments